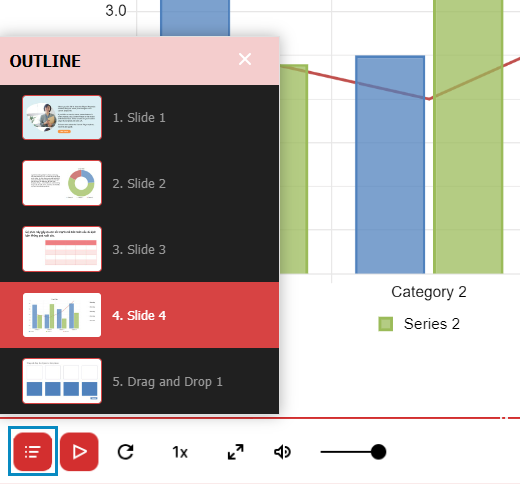
Control how the outline or table of contents looks and behaves in SmartTutor 360 courses. We’ll explore several formatting options in this user guide.
For the outline to appear in your course, it needs to be enabled in your player (the frame around your slides). Learn how to choose player features.
- Customizing the Outline
- Renaming Slides in the Outline
- Rearranging Outline Items
- Changing the Indent Level of Outline Items
- Controlling the Collapse and Expand Behavior of Levels
- Adding New Groups to the Outline
- Removing Groups from the Outline
- Resetting the Outline to Its Default State
- Numbering Scenes and Slides
- Changing the Name of the Outline Tab
Customizing the Outline
To customize your course outline, go to the Home tab on the ribbon and click Player Editor.
When the player properties appear, click Outline on the ribbon. As you make changes on the left side of the window, the preview area on the right will update to reflect your choices.
Tip: If you’re chosen Sidebar’s position is On Bottom Bar and you don’t see the sidebar in the preview area, click the menu icon (☰) to reveal the outline menu.

Renaming Slides in the Outline
The titles you see in the outline default to the slide titles from your project. You can change the titles in the outline without changing the content in your course.
To rename a slide in the outline, double-click it, type a new title, and press Enter on your keyboard.
Rearranging Outline Items
To change the order of items in the outline, just drag them to a new location in the list, or use the up and down arrows below the outline.
| Note: Rearranging outline items doesn’t change the order in which slides are navigated in the published output. It only changes their visual sequence in the outline. To change the actual navigation order, edit the navigation Actions in your course. |
Changing the Indent Level of Outline Items
Organize your outline by adding group levels. Just select a slide in the outline editor, then click the right arrow to increase the indent (to demote it) or the left arrow to decrease the indent (to promote it).
When you publish, a small right chevron will appear next to any slide that has sublevels beneath it. Learners can click the chevron to collapse and expand levels.
Controlling the Collapse and Expand Behavior of Levels
You can make levels automatically collapse as learners complete each section. Here’s how:
- Go to Layout tab in Features, in Side bar section, mark the box to Auto-collapse outline as learner progresses.
By default, all levels will be expanded when learners launch your course. If you want a level to start in a collapsed state, click the small chevron next to the title in the outline editor.
Adding New Groups to the Outline
Sometimes you might need to add static titles to your outline to help organize it. For example, you might want to add section headers between slides.
Click the New Group button (plus icon), a New Group title is added automatically.
Drag the new title where you want it in the outline, or use the up and down arrows below the outline to move it.
Removing Groups from the Outline
Sometimes it’s helpful to remove a title from the outline. Just select the scene or slide title and click the Delete Group button below the outline.
Slides you remove from the outline will still be part of your published course; they just won’t show in the outline.
If you remove a title that has indented slides below it, SmartTutor 360 will give you the option to keep them or remove them.
Resetting the Outline to Its Default State
If you make changes to your outline and then decide you want to reset the outline back to its original state, click the Reset default button below the outline.
Resetting the menu does the following:
- Slide titles revert back to the way they appear in your project.
- Indent group levels are removed.
- New group that were added get removed.
- Slides that were removed get added back to the menu.
Numbering Scenes and Slides
To automatically number scenes and slides in your outline, do this:
- Click the Numbering button (the numbering icon) below the outline.
- Choose one of three numbering styles
- Click OK.
Changing the Name of the Menu Tab
Want to change the title of the Menu tab? Just edit the name in your player text labels. If you need help editing text labels, see this user guide.