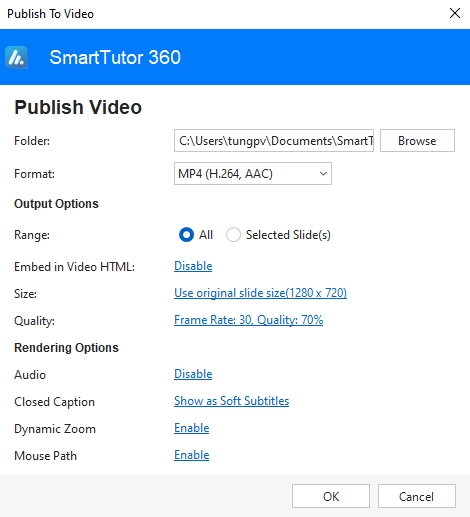
The SmartTutor 360 allows you to publish presentations to Video and HTML5 format in a couple of clicks and tune appearance settings for the output course.
Step 1: Prepare Your Course for Video Publishing
Since videos aren’t interactive, you’ll need to build your SmartTutor 360 course with this in mind if you plan to publish to video. You can’t use actions that require learners to click, enter, leave, drag, type, or interact with the content in any way. Interactive triggers simply won’t work when publishing a course to a video file.
If you’ve already built an interactive course and you want to publish it as a video, duplicate the project file so you have a backup copy, then adjust interactive triggers so they execute automatically when the timeline reaches a certain point, when an animation completes, or when media completes. (You don’t have to change triggers for the “next” buttons in your course. SmartTutor 360 will automatically advance slides when you publish to video.)

Step 2: Enter a Title and Publish Location
- Format: Access the format drop-down list and choose the format that fulfills your requirements. SmartTutor 360 provides many different types of video format including:
-
MP4 (H.264, AAC)
-
MP4 (HEVC, AAC)
-
WEBM (VP8, Vorbis)
-
WEBM (VP9, Vorbis)
-
MKV (FSV1, PCM 16-bit)
-
AVI (MPEG-4, WMA2)
-
WMV (WMV2, WMA2)
-
- Folder: Specify the file path for the exported video.
Step 3: Choose Output Options
- Range : Choose publish all slides or a portion slides
- Embedded in HTML: SmartTutor will export your project to a video, then embed it in HTML page to be viewed in a browser. This option is only available for the MP4 output format.
- Size: The default value is 100 which means the exported video will have the same size as the project size. Bear in mind that SmartTutor 360 will resize the video using bicubic interpolation.Note: The aspect ratio is fixed when you create the project. You cannot change it at the render time. So, when you specify the width or height, the video size will be automatically calculated.This option lets you set the size of the published video based on the project size.
- Quality : Use the slider to choose a quality level for your published video: use Frame rate and Quality slider/ spinbox.The higher the quality, the larger your published video file will be.
Step 4: Rendering Options
- Audio : if Audio enable, SmartTutor will export the audio file in your project (both system audio and voice over file) along with the output video.
Channels: Select the audio channel from Mono or Stereo. With Mono, the stereo channel needs double file size. However, the Stereo channel can provide listeners with a more natural experience.
If there is no special audio quality, the Mono channel is good enough for recording video demonstrations.
Sample Rate: The sample rate determines the fidelity or the quality standard of the audio. The higher the fidelity, the better the audio quality. A higher sample rate increases the fidelity and audio size and vice versa. In SmartTutor 360, you should let this value be 4800 Hz.
Bit Rate: This is the number of bits that are conveyed per second. The higher the bit rate you select, the better the audio quality is. This option is only available for MP4, AVI or WMV video type. You can select one from six options from the Bit Rate list.
- Closed Captions: SmartTutor will publish your project to a video along with a separate subtitle file with .srt extension( Soft Subtitles) or to be hard-coded inside the video(Hard Subtitles)
- Dynamic Zoom: Your output video will show the dynamic zoom that you’ve inserted in.
- Mouse Path: Your output video will include the mouse cursor and mouse movements recorded.