Feedback masters in SmartTutor 360 let you control the default colors, fonts, text, and objects for question feedback layers. Save time by using feedback masters to give your feedback layers a consistent look and feel throughout your course.
- Switching to Feedback MasterView
- Adding Feedback Masters and Layouts
- Managing Feedback Masters and Layouts
- Designing Feedback Masters and Layouts
- Closing Feedback Master View
Switching to Feedback Master View
To switch to the feedback master, go to the View tab on the ribbon and click Feedback Master.
A Storyline 360 course can have as many feedback masters as you want, and every course has at least one. Thumbnail images of your feedback masters appear in the left panel. If you haven’t created any yet, you’ll see the default feedback master.
Each feedback master is a collection of layouts for various types of feedback, including Correct, Incorrect, Try Again, Complete, Incomplete, Resume, Review, and Blank. The feedback master thumbnail in the left panel is slightly larger than the thumbnails of its layouts below.
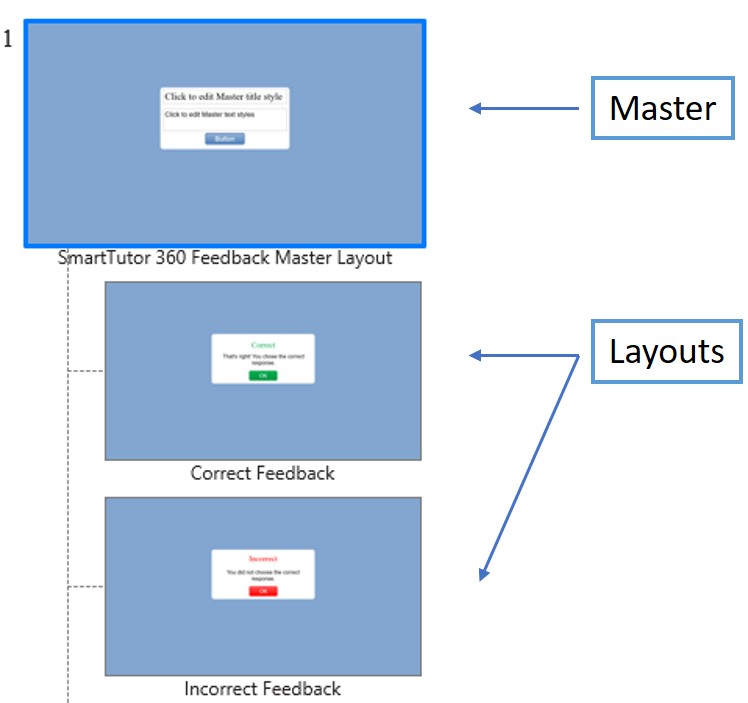
Each layout inherits all the properties of its parent feedback master, but you can customize each layout to display content in a specific way. For example, you might design your correct feedback layout with affirmative text and images, while your incorrect feedback layout might have placeholders for corrective content.
Adding Feedback Masters and Layouts
To create a new feedback master, switch to Feedback Master view, then do either of the following:
- Go to the Feedback Master tab on the ribbon and click Insert Slide Master.
- Right-click anywhere in the left panel and select Insert Slide Master.
You can also add more layouts to each feedback master. Here’s how:
- In the left panel, select the feedback master where you want to add a new layout.
- Go to the Feedback Master tab on the ribbon and click Insert Layout, or right-click the feedback master thumbnail and select Insert Layout.
The new layout will inherit the properties of its parent feedback master, and it’ll have a Title text box (which can be deleted or turned off—see below).
Managing Feedback Masters and Layouts
You can delete, rename, preserve, and duplicate feedback masters and layouts.
Designing Feedback Masters and Layouts
To design your feedback masters and layouts, use the Home, Insert, Transitions, and Animations tabs on the ribbon as well as the following features found on the Feedback Master tab.
| Insert Placeholder | The Insert Placeholder drop-down has several optional placeholders for layouts: content, text, picture, character, video, and web object.
After adding a placeholder to a layout, you can resize it and position it where you want it on the slide. This option isn’t available for feedback masters. It only applies to layouts. |
| Title | The Title box adds a title placeholder to a layout when it’s checked. Uncheck the box to remove the title placeholder.
This option isn’t available for feedback masters. It only applies to layouts. |
| Background Styles | The Background Styles drop-down lets you apply a consistent background design to your feedback masters and layouts.
|
| Hide Background Graphics | When the Hide Background Graphics box is marked, objects on the current layout that have been inherited from its parent feedback master will be hidden.
Hidden background graphics won’t appear in your published course for any feedback layers that are based on that layout. This option isn’t available for feedback masters. It only applies to layouts. |
Closing Feedback Master View
To exit Feedback Master view, go to the Feedback Master tab on the ribbon and click Close Master View. Any changes you made to existing feedback masters and layouts will automatically be applied to slides in your course.