An easy way to update your course design is by switching fonts. Theme fonts control the appearance of headings, body text, questions, and answer choices. SmartTutor 360 offers several built-in theme fonts, and you can also create your own custom fonts.
Understanding Theme Fonts
Each set of theme fonts includes a heading font and a body font.
- Heading Font: Used for slide titles, question text, and marker titles.
- Body Font: Applied to slide text (including shapes, captions, and buttons), answer choices, and marker descriptions.
To view your collection of theme fonts, go to the Design tab on the SmartTutor ribbon and click Fonts.
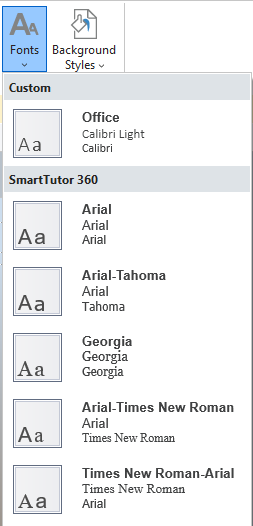
Custom theme fonts you’ve created will appear at the top of the list, with built-in theme fonts listed below. The theme fonts currently applied to the selected slide are highlighted in blue. For each theme font set, you’ll see the theme name, the heading font, and the body font.
Applying and Managing Theme Fonts
Hover over a set of theme fonts to preview what they’d look like if applied to the current slide. Just click a theme to apply it to all the slides in your course.
Right-click a theme to see these additional options:
| Apply to Matching Slides | This applies the theme fonts to all slides based on the same slide master as the current slide. |
| Apply to All Slides | This applies the theme fonts to all slides in your course. (You can achieve the same thing by left-clicking the theme fonts in the list.) |
| Edit | This opens the theme editor. (See Customizing Theme Fonts below.) This option is only available for theme fonts you’ve created, not built-in theme fonts. |
| Delete | This removes the selected theme fonts from SmartTutor 360. This option is only available for theme fonts you’ve created, not built-in theme fonts. |
Creating New Theme Fonts
Here’s how to create a new set of theme fonts:
- Go to the Design tab on the ribbon and click Fonts.
- Select Create New Theme Fonts at the bottom of the drop-down list.
- When the theme editor appears, choose a heading font and a body font. (As you make changes, the sample area on the right side of the window updates to reflect your choices.)
- Enter a name for your custom theme fonts.
- Click Save.
Your custom theme fonts will be available in any course you build.
Customizing Theme Fonts
It’s easy to modify your custom theme fonts. Here’s how:
- Go to the Design tab on the ribbon and click Fonts.
- Right-click the custom theme fonts you want to modify and select Edit.
- When the theme editor appears, choose new fonts and click Save.
Built-in theme fonts can’t be modified. However, you can create your own theme fonts based on built-in themes. Here’s how:
- First, apply the built-in theme fonts you want to use as your base fonts to your course (i.e., left-click the theme).
- Then, click the Fonts drop-down again and choose Create New Theme Fonts. The theme editor will open, and the fonts will default to those from the built-in theme you’re currently using (from step 1).
- Just edit the fonts to your liking and save the theme with a new name.
Using Theme Fonts on Slide Masters
You can apply theme fonts to slide masters in the same way you apply them to course slides. Slides in your course that are based on the modified slide master will inherit those same theme fonts.
You can always override the default fonts for a course slide by manually customizing individual text boxes.