Adding a background to your SmarTutor project is a simple and fun way to make your slides look more interesting. It’s something we do often when we create new projects, but not everyone knows the best way to do it. If you’ve been putting pictures or colored shapes on your slides and adjusting them to fit, there’s actually a better way to add backgrounds. There’s more to learn about backgrounds than you might think, so let’s check out some easy tips and tricks to make your backgrounds look great in SmartTutor 360.
Background Types
Let’s take a look at the different types of backgrounds you can add in SmartTutor. When you open the Properties tab, you’ll notice two options: Fill and Slide Background.

Customize Slide Background with Fill
SmartTutor 360 gives you complete control over your background design. By using Fill, you can fill the background with a solid color, gradient, or picture.
Solid: his option gives you the ability to select a solid color to fill the entire background of the layer and to adjust the transparency of the background fill color.
With Color and Transparency, you can use a solid color for selected slides
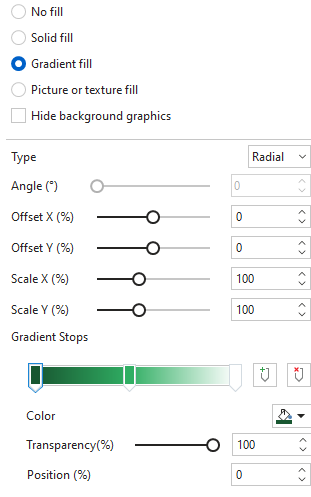
Gradient: If you don’t want a solid background color, you can use a gradient, which lets you blend different colors together. SmartTutor offers lots of options to help you adjust your gradient until it looks just right.
Picture or texture fill : you can insert a photo of your own to display as the background. Either upload a photo from your files, or use the last photo on your clipboard.
With either option, you have the ability to set the texture or the picture to tile (repeat the picture or texture within the background) or stretch (fill the background).
Hide background graphics: This is useful when you have a background on a slide master layout. It will keep the background fill intact but will hide any other additional graphics (shapes, textboxes, characters, etc.) that appear on that slide master layout.
Reset background: This button will reset the background of either the base layer or a slide layer to the default background of the master layout in question.
Apply to all: If you are on the base layer when you click this option, this will apply your current background to all base layers in your project, including those in the slide master. If you are editing a slide layer, when you click this option, this will apply your current background to all slide layers in your project, including those in the feedback master.
Customize Slide Background with Picture
This way allows you to set an image as the slide background.

If the imported image is larger than the slide size, it will be cropped. For this reason, SmartTutor 360 lets you change the background picture position and size in px
- Left: Specify the X position of the background image from the top-left corner.
- Top: Specify the Y position of the background image from the top-left corner.
- Width: Display the original width of the background image, but it’s changeable.
- Height: Display the original height of the background image, but it’s changeable.
If the changes don’t please you, click Restore Default to restore the imported image to its initial size. Besides, you can select Fit To Background to make the imported image fit the slide size.
In case you want to delete the background image of the current slide, click Remove
Use Background Styles
Another way to format the background of your slide is to navigate to the design tab on the ribbon. On that tab, you’ll notice a “Background Styles” area.
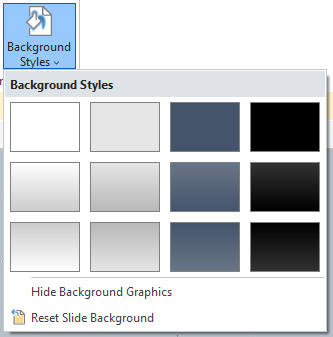
Right-click a style and choose any of the following:
- Apply to Matching Slides: Work the same as when you click a style.
- Apply to Selected Slides: Apply the background style to currently selected slides only. The option comes in handy when you want to apply different styles to different slides.
- Apply to All Slides: Apply the background style to all slides in your working project
Use Slide Masters
if you need to update or change the background, you can do it once on the master instead of having to do it for each individual slide that uses that background. The slide master is a huge timesaver. And remember: the slide master only controls the backgrounds for the base layer of a slide. If you want to create a background that you can use more than once for multiple slide layers, follow these same steps, but in the feedback master.
Do as follow to change the background:
- Open the View tab > Slide Master.
- Select a slide layout.
- Navigate to the Fill section in the Properties pane.
- Change the background as described in part 1.
- Click Close Master View to save the changes.
As you can see, there’s more to formatting a background than just adding an image or shape to a slide. There are smarter ways to work with backgrounds that can save you time and effort, like using slide and feedback masters. It’s also important to know the difference between the slide background, which can be a little tricky at first.
Do you have any other tips or tricks for working with backgrounds in SmartTutor 360? Did I miss something important? If so, please share your thoughts in the comments—I’d love to hear from you!
Want to try something you learned here, but don’t have SmartTutor 360 software? Download a free version,