You can use the table tools to easily add and delete table rows and columns in SmartTutor 360.
Add a row
- Click a table cell in the row above or below where you want the new row to appear.
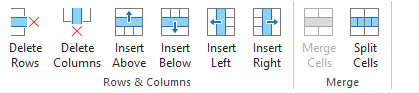
- On the Table Layout tab, in the Rows & Columns group, do one of the following:
- To add a row above the selected cell, click Insert Above.
- To add a row below the selected cell, click Insert Below
Notes:
- To add multiple rows at once, using your mouse, drag to select an equal number of rows to the amount that you want to add, and then click Insert Above or Insert Below. For example, select three existing rows, click Insert Above or Insert Below, and three more rows will be added.
- To add a row at the end of a table, click the rightmost cell of the last row, and then press Tab.
Add a column
- Click a table cell to the right or the left of the column where you want the new column to appear.
- On the Layout tab, in the Rows & Columns group, do one of the following:
- To add a column to the left of the selected cell, click Insert Left.
- To add a column to the right of the selected cell, click Insert Right.
Note: To add multiple columns at once, using your mouse, drag to select an equal number of columns to the amount that you want to add, and then click Insert Left or Insert Right. For example, select three existing columns, click Insert Left or Insert Right, and three more columns will be added.
Delete a row or column
- Click a table cell in the column or row that you want to delete.
- On the Table Layout tab, in the Rows & Columns group, click Delete Columns or Delete Rows.