You can change the appearance of tables in your SmartTutor 360 presentation by combining or splitting table cells.
If you want to delete an entire row or column of a table, see Add or delete table rows and columns.
Merge table cells
To combine two or more table cells in the same row or column into a single cell, do the following:
- On the slide, select the cells that you want to combine.
- On the ribbon, select the Table Layout tab.
- In the Merge group, click Merge Cells.
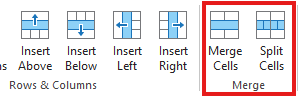
Split table cells
To divide a table cell into more cells, do the following:
- Click the table cell that you want to split.
- On the ribbon, select the Layout tab.
- In the Merge group, click Split Cells, and then do one or more of the following:
- To divide a cell vertically, in the Number of columns box, enter the number of new cells that you want.
- To divide a cell horizontally, in the Number of rows box, enter the number of new cells that you want.
- To divide a cell both horizontally and vertically, in the Number of columns box, enter the number of new columns that you want, and then in the Number of rows box, enter the number of new rows that you want.
- Manually move or add content to the newly created empty cell or cells.
Remove the content of a cell
Select the cell content that you want to delete, and then press Delete.
| Note: When you delete the content of a cell, the cell itself is not deleted. To delete the cell, you must merge table cells (as described in the first procedure above) or delete the entire row or column. |