If you noticed that there’s some background noise in your audio clip.
- Select the pure noise part on the timeline
- Click Remove Noise on the toolbar.
- Confirm it in the How to use noise removal dialog.
- If the Noise Reduction effect doesn’t work as you expected, click Restore Defaults and try again with different settings. Bear in mind that you don’t have to get a new noise profile if you think the existing one is good enough.
- Click OK to apply the effect to the selected ranges.
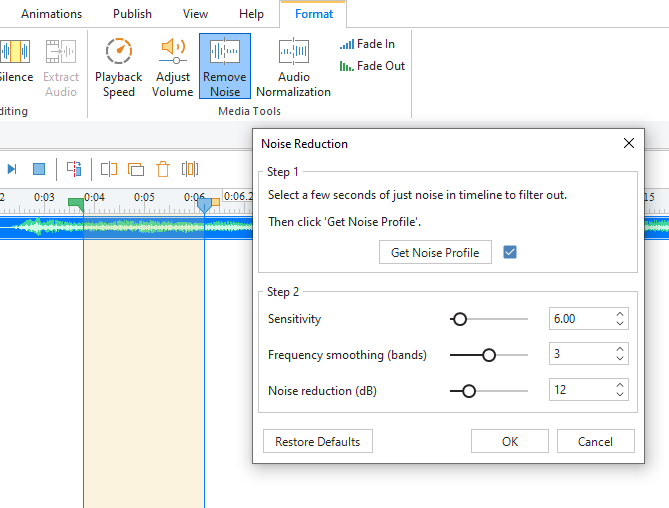
Get Noise Profile : SmartTutor 360 lets you reduce background noise for the whole audio track or just a part of it. To do that, firstly, you need to get a noise profile. A noise profile is an audio sample that contains the noise only.
Tips:
- When getting a noise profile, you shouldn’t choose a very short range because the app cannot get the noise profile. A selection of 2 – 4 seconds of only noise is recommended.
- The noise profile you got will be stored in the application. It will be lost in case you close the program or replace it with another noise profile.
Sensitivity: Control how much of the audio will be considered as noise. Greater sensitivity will remove more noise but it can damage the track. Thus keep this control as low as possible.
Frequency smoothing (bands) : Spread the noise reduction into the specified number of neighboring bands. Smoothing can make the desired audio less clear, so set the value to 0 if your desired signal is strong and the noise is low.
Noise reduction (dB) : Control the amount of volume reduction (0 – 48 dB) applied to the identified noise. Higher values reduce higher amounts of volume reduction, making the noise quieter but can distort the audio track. So, keep this control as low as possible.
Note:
|