The Timeline is a visual representation of the timing of all objects on a slide. It will provides an easy way to view, at a high level, all objects on a slide and their relationship to each other. in this tutorial, we will learn about working with the Timeline
So basically, with the Timeline, you can organize objects and precisely control the timing of objects.
For example, on a slide that contains a caption, an image, and a click box, you can display the caption, then the image 4 seconds later, and then the click box 2 seconds after that. The Timeline also shows any audio associated with the slide or with objects on the slide. You can easily coordinate the timing of audio with the slide using the Timeline.
The major components of the Timeline
The major components of the Timeline are objects, the header, and the playhead
- The objects on a slide are displayed as stacked bars in the right pane of the Timeline.
- The header at the top of the Timeline indicates time in seconds (and parts of seconds), in minutes:seconds format. For example, 1:05 indicates 1 minute and 5 seconds. The markings helps you see exactly when objects appear.
- The playhead (
 ) shows the point in time in which the slide is being viewed.
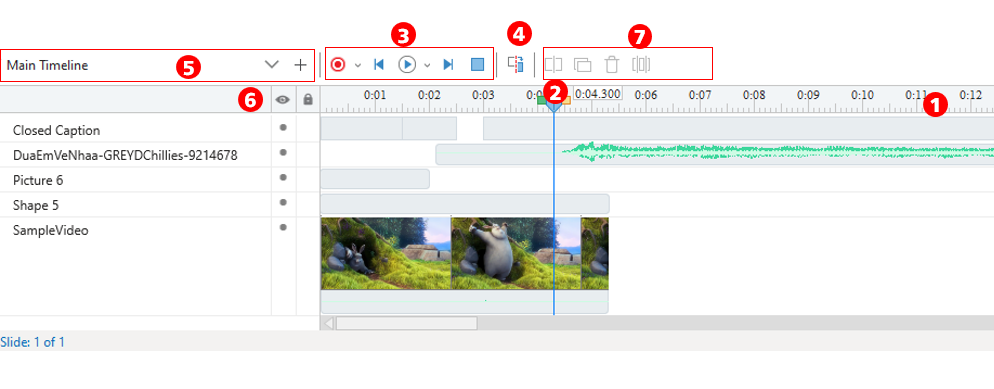
The major components of the Timeline panel are explained in the table below:
|
Id |
Description |
|---|---|
|
1 |
The Timeline ruler. The units are in seconds and are in increment of 0.1 seconds. |
|
2 |
The blue pentagon shape represents a playhead. You can drag the playhead to any position in the timeline. |
|
3 |
Standard video buttons, which include Play/Pause, Stop, Record Audio Narration, Previous Playhead to the previous object, and Next Playhead to the next object. |
|
4 |
Split Slide : Split the slide into 2 separate slides |
|
5 |
Displays the currently selected timeline. A Main Timeline is created by default when creating a new project. Click plus icon( |
|
6 |
Eye button ( Lock button ( |
|
7 |
Basic Editing Timeline: Cut/ Copy/Delete and Crop a range in timeline |
 ) to create a new Timeline or a Click Animation
 ). Click this button to hide all objects. Click the button again to show the objects. Click on the gray dot to hide an individual object.
 ). Click this button to lock all objects in every track.
Show or hide the Timeline
Select View > Timeline to show the timeline.
Changing the Timing and Duration of Objects
To control when an object appears (or animates in), drag it left or right along the timeline.
To change the duration of an object, drag its right edge along the timeline. This controls when the object disappears (or animates out).
Timeline Animation Editing
View and adjust the duration of object animations right from the timeline. See what objects are animated and adjust their animation duration quickly without having to enter values in the ribbon. This works with all entrance and exit animations, as well as motion path animations that occur when the timeline of the object starts.
See What Objects Are Animated
When you add animation to an object, you’ll see a representation equal to its duration on the timeline, as shown below.
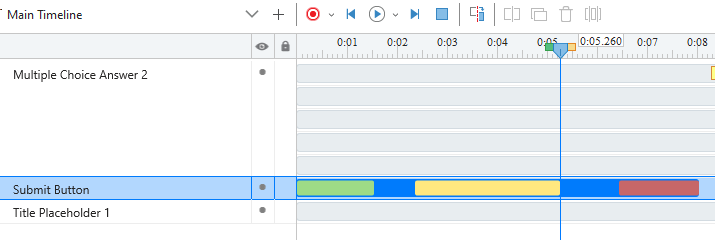
Adjust Animation Durations
Hover over a timeline element, and ew-resize cursor appear at the beginning or end of the animation. Click and drag the handle to manually adjust the animation’s duration. The animation duration value updates on the ribbon when you release the handle.
Previewing a Slide
Quickly preview a slide using the player controls in the top left corner of the timeline. Timeline previews aren’t interactive. They let you see how slides look without previewing or publishing your course.
- Click the play/pause button once to start the playhead (blue vertical line) moving along the timeline.
- Click the play/pause button again to pause the playhead at its current location.
- Click the stop button to end the preview and return the playhead to beginning of the timeline.